
The SDL Library is a very good choice when you want to program games. But when you want to write your game in the C programming language without the C++ ballast, can you still use it?
The Simple DirectMedia Layer Library is natively written in C and therefore works very well in a program which is written in Pure C. Because it is licensed under the zlib license it can be used freely in any software.
We will soon see a full program written with the SDL2 library which has some graphics out put and some user input. Read on to find out how it is done.
Using the SDL (Simple DirectMedia Layer) Library in Pure C
The Simple DirectMedia Layer Library is a C library that has bindings to several other languages and can of course be used in C++. Unlike OpenGL (which you can also use for graphics programming in C as I pointed out in another article) it is more than a graphics only library. It also supports window management, input handling, sound and more. You can even use it together with OpenGL in case you want to do something more sophisticated with your graphics.
In the following we will see a complete C program introduces SDL2 and its main video and input functionality.
Example of a SDL Program written in Pure C
Showing is better than telling, so here we will write a program that goes through several SDL functions and what they do. In contrast to the example in the Drawing Shapes article, the functionality here is described in more detail and also the program can accept some more input from the user.
The description of the program is divided into several sections, the program itself can be written in a single file though. If you copy and paste the code pieces from top to bottom (and have the SDL2 library present at the include paths!) you should be able to compile and run the example with your favourite C compiler & linker.
Includes, Defines and Declarations
The only includes we need are for the SDL2 library and for the standard output to the console. If you include (and link) SDL2_main you can use a simple main function and don’t need to implement the WINAPI WinMain(…).
/** INCLUDES **/
#include "../SDL2/SDL2-2.0.20/include/SDL.h"
#include "../SDL2/SDL2-2.0.20/include/SDL_main.h"
#include <stdio.h>
The defines are mostly for convenience and readability. As C has no boolean type we declare one along with true and false, also we declare the SDL return value for everything ok. WIDTH and HEIGHT of the screen can be changed here and the setColour_t type comes in handy later.
/** DEFINES **/
#define SDL_OK	0
#define TRUE	1
#define FALSE	0

#define WIDTH	1024
#define HEIGHT	768

typedef int BOOL;

typedef enum setColour_t {
	RED,
	GREEN,
	BLUE
} setColour_t;
The first two variables are for SDL Window and Rendering purposes (as the type names imply) and the rest is for the colour switching behaviour we are going to implement. All the variables are static which in this case means that they are private to this file.
/** LOCAL VARIABLES **/
static SDL_Window* _window		= NULL;
static SDL_Renderer* _renderer	= NULL;

static Uint8 _redContent = 255;
static Uint8 _greenContent = 0;
static Uint8 _blueContent = 0;

static Uint8 _redBackgroundContent = 0;
static Uint8 _greenBackgroundContent = 0;
static Uint8 _blueBackgroundContent = 0;

static setColour_t _setColour = RED;
The Main Program
Before we get to the implementation we declare all functions that we will need along the way. I sorted them alphabetically, but that really doesn’t matter. The only reason to declare it here is that we first can write our program structure and defining the contents later.
/** FUNCTION DECLARATIONS **/
void cleanUpSdl();
void createRectangle();
BOOL initializeSdl();
BOOL initializeSdlWindow();
BOOL isEventLoopRunning();
void renderAll();
void setBackground();
void setColour(const BOOL isUp);
And here it is, the program that we want. At this point in time it feels like wishful coding, because none of these function does what the name suggests it would do. We will implement them in the next sections, but it is always a good idea to have some blueprint for what you are going to do.
If the initialization of SDL itself or the window fails then there is no point in running the software, so we exit with an error code. If all is OK we start the main loop with constantly checking the event loop and drawing our stuff to the screen. If the loop is interrupted, we clean everything up and leave.
/** MAIN PROGRAM**/
int main(int argc, char** argv)
{
	if (initializeSdl() == FALSE) return -1;
	if (initializeSdlWindow() == FALSE) return -2;

	while (isEventLoopRunning()) {
		setBackground();
		createRectangle();
		renderAll();
	}

	cleanUpSdl();

	return 0;
}
Initialization
We initialize the SDL library and checking if this was successful. If not we print the error message to the console and return false. SDL_INIT_VIDEO as the only parameter means that we only initialize the video subsystem. If we, for instance, also wanted to play audio files we would have to call
SDL_Init(SDL_INIT_VIDEO || SDL_INIT_AUDIO)
instead. There are more subsystems which you can read about in the documentation of SDL2.
BOOL initializeSdl()
{
	if (SDL_Init(SDL_INIT_VIDEO) != SDL_OK) {
		printf("Error while initializing SDL: %s", SDL_GetError());
		return FALSE;
	}

	return TRUE;
}
When the SDL is initialized successfully we can create a window with the window, renderer and size parameters we created earlier. We also can set a title which is shown when the program starts. We do the same error handling here as we did in the initializeSdl() function.
BOOL initializeSdlWindow()
{
	if (SDL_CreateWindowAndRenderer(WIDTH, HEIGHT, SDL_WINDOW_RESIZABLE, &_window, &_renderer) != SDL_OK) {
		printf("Error while creating SDL Window: %s", SDL_GetError());
		return FALSE;
	}

	SDL_SetWindowTitle(_window, "SDL2 in Modern C - Playing With Colours");

	return TRUE;
}
The Event Loop
The Event Loop does a bunch of things. First it checks all the events that it may have get from the operating system or other drivers. We will use it to check for either a close request (if the user clicks on the X of the window, for example) or for user input.
When the user presses the escape key, we will return FALSE meaning that the main loop should end and the program should close. The keys r, I and b switch the setColour which means that it changes the colour component that the user is able to manipulate with the arrow keys up and down.
The reason why we differentiate between SDL_KEYUP and SDL_KEYDOWN is because we want to set the mode (or escape the loop) only once per key press. But we want the colour to change constantly if the users keeps on of the arrow keys pressed.
BOOL isEventLoopRunning()
{
	SDL_Event sdlEvent;

	while (SDL_PollEvent(&sdlEvent) != SDL_OK) {
		switch (sdlEvent.type)
		{
		case SDL_KEYUP:
			switch (sdlEvent.key.keysym.sym) {
			case SDLK_ESCAPE:
				return FALSE;
			case SDLK_r:
				_redContent = 255;
				_greenContent = 0;
				_blueContent = 0;
				_setColour = RED;
				break;
			case SDLK_g:
				_redContent = 0;
				_greenContent = 255;
				_blueContent = 0;
				_setColour = GREEN;
				break;
			case SDLK_b:
				_redContent = 0;
				_greenContent = 0;
				_blueContent = 255;
				_setColour = BLUE;
				break;
			default:
				break;
			}
			break;
		case SDL_KEYDOWN:
			switch (sdlEvent.key.keysym.sym)
			{
			case SDLK_UP:
				setColour(TRUE);
				break;
			case SDLK_DOWN:
				setColour(FALSE);
				break;
			default:
				break;
			}
			break;
		case SDL_QUIT:
			return FALSE;
		default:
			break;
		}
	}

	return TRUE;
}
Drawing & Rendering
Drawing the background colour is the result of the current state of the partial background colour variables. First we set the colour and then we use the SDL_RenderClear(…) function to set the background to this colour.
void setBackground()
{
SDL_SetRenderDrawColor(_renderer, _redBackgroundContent, _greenBackgroundContent, _blueBackgroundContent, 255);
SDL_RenderClear(_renderer);
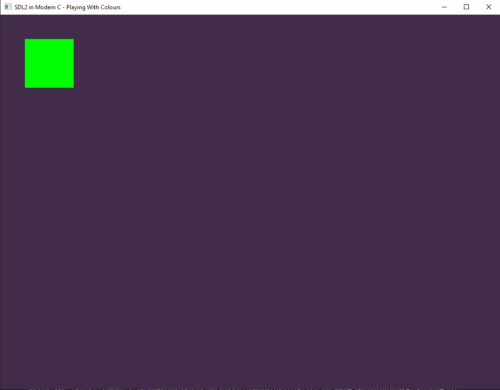
}We create a small rectangle at the top left of the window. This rectangle will be filled with the colour corresponding to the setColour we chose. If we press g it’ll be green, and so forth. This way the user is able to see which colour he actually manipulates with the arrow keys.
This is a three step process: First create the rectangle with position and size. Then set the colour we want to have and lastly fill the rectangle with this colour.
void createRectangle()
{
	SDL_Rect rect = { 50, 50, 100, 100 };
	SDL_SetRenderDrawColor(_renderer, _redContent, _greenContent, _blueContent, 255);
	SDL_RenderFillRect(_renderer, &rect);
}
The colour is set in dependence to the keys that were pressed beforehand. We change its values here so everytime the background is drawn it uses this values that we are able to manipulate with the up and down arrow keys.
If currently red is set, we change the R part of the RGB colour. We can slide between 0 and 255 meaning no red to full red. The same is true for green and blue when they are selected trough the corresponding keys. Everything 0 means black and everything 255 means white. We make sure that no colour component can be lass then 0 or more than 255.
void setColour(const BOOL isUp)
{
	switch (_setColour)
	{
	case RED:
		if (_redBackgroundContent < 255 && isUp) { _redBackgroundContent++; }
		if (_redBackgroundContent > 0 && !isUp) { _redBackgroundContent--; }
		break;
	case GREEN:
		if (_greenBackgroundContent < 255 && isUp) { _greenBackgroundContent++; }
		if (_greenBackgroundContent > 0 &&! isUp) { _greenBackgroundContent--; }
		break;
	case BLUE:
		if (_blueBackgroundContent < 255 && isUp) { _blueBackgroundContent++; }
		if (_blueBackgroundContent > 0 && !isUp) { _blueBackgroundContent--; }
		break;
	default:
		break;
	}
}
The actual rendering is very simple and you may think why this is even in its own function. We do this for the sake of clarification, for staying on the same level of abstraction and because in the future there may be more things to do before actually render.
void renderAll() {
	SDL_RenderPresent(_renderer);
}
Cleaning Up
Cleaning up is also very simple. We just destroy the renderer and the window that we created (in that order) and tell the SDL Library to quit. These calls do all the memory cleaning for us and we can return to the operating system in good conscience.
void cleanUpSdl()
{
	SDL_DestroyRenderer(_renderer);
	SDL_DestroyWindow(_window);
	SDL_Quit();
}
That’s it and now you should see something like the screenshot above. You can now try the functionality for yourself and maybe even modify it for practice purposes.